


SERVICE MANUAL NUMBER 26
IGNITION SYSTEM
Engine Disturbed
1.
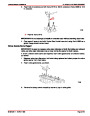
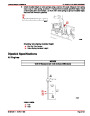
Locate No. 1 piston in firing position by either of two methods described below.
a. Remove No. 1 spark plug and, with finger on plug hole, crank engine until compres-
sion is felt in No. 1 cylinder. Continue cranking until pointer lines up with timing mark
on crankshaft pulley, or
b. Remove rocker cover and crank engine until No. 1 intake valve closes, continuing
to crank slowly until pointer lines up with timing mark on crankshaft pulley.
2.
3.
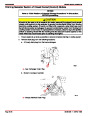
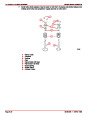
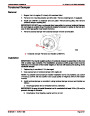
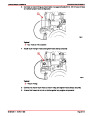
Position distributor to opening in block in normal installed attitude.
Position rotor to point toward front of engine (with distributor housing held in installed
attitude), then turn rotor counterclockwise approximately 1/8-turn more to the left and
push distributor down to engage camshaft. It may be necessary to rotate rotor slightly
until camshaft engagement is felt.
4.
While pressing down firmly on distributor housing, engage starter a few times to make
sure oil pump shaft is engaged. Install hold-down clamp and bolt and snug up bolt.
5.
6.
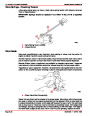
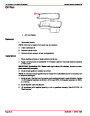
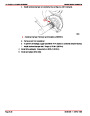
Turn distributor body slightly until points just open and tighten distributor clamp bolt.
Place distributor cap in position and check that rotor lines up with terminal for No. 1 spark
plug. Install cap.
7.
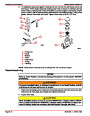
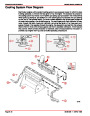
Install cap, distributor primary lead to coil. Check and connect spark plug wires, if they
have been removed. Wires must be installed in their proper location in supports to
prevent cross-firing. Firing order is 1-3-4-2.
8.
Install rotor.
9.
Replace distributor cap.
10.
Time ignition as outlined under “Ignition Timing,” in this section.
Ignition Timing
IMPORTANT: Failure to follow the timing procedure instructions will result in
improper timing causing performance problems and possible severe engine
damage.
1.
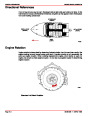
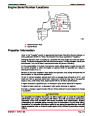
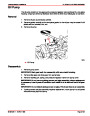
Connect timing light (91-99379 or similar) to No. 1 spark plug wire. Connect power sup-
ply leads on light to 12 volt battery. Refer to Specifications - “Engine Rotation and Firing
Order,” for cylinder numbering and location.
2.
Connect a shop tachometer to engine.
NOTE: Before starting engine make sure the timing tab and mark on damper are clean.
Chalk or white paint on timing mark on damper may help visibility.
Index
90-861329--1
MARCH 1999
Page 4B-9
| Categories | Mercury MerCruiser Manuals |
|---|---|
| Tags | Mercury MerCruiser 181 CID |
| Model Year | 1998, 1999, 2000, 2001, 2002, 2003, 2004, 2005, 2006, 2007, 2008, 2009, 2010, 2011 |
| Download File |
|
| Document File Type | |
| Copyright | Attribution Non-commercial |
(6 votes, average: 5 out of 5)
Marine readers have rated Mercury MerCruiser GM 4 Cylinder 181 cid 3.0L Marine Engines Service Manual Number 26 5.0 out of 5.0 based on 6 product reviews. Thanks for sharing this material. Helps a lot after suffering with bad mechanics. spend too much money and nothing very good
great manual, makes impossible jobs possible. without a manual you can not do the job, a must have.
Great resource. Excellent information provided.
Need help to install automate choke
Need help to instal automate choke