


181
CID (3.0L) 4 CYLINDER GM ENGINE
SERVICE MANUAL NUMBER 26
5.
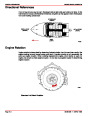
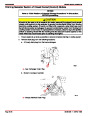
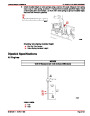
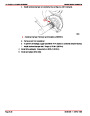
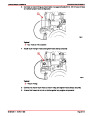
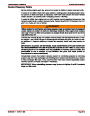
On the edge of the gauging plastic envelope there is a graduated scale which is corre-
lated in thousandths of an inch. Without removing the gauging plastic, measure its com-
pressed width (at the widest point) with the graduations on the gauging plastic envelope
as shown.
b
a
72358
a - Compressed Gauging Plastic
b - Graduated Scale
NOTE: Normally main bearing journals wear evenly and are not out of round. However, if
a bearing is being fitted to an out-of-round journal (.001 in. max.), be sure to fit to the
maximum diameter of the journal. If the bearing is fitted to the minimum diameter and the
journal is out of round .001 in., interference between the bearing and journal will result in
rapid bearing failure. If the flattened gauging plastic tapers toward the middle or ends, there
is a difference in clearance indicating taper, low spot or other irregularity of the bearing or
journal. Be sure to measure the journal with a micrometer if the flattened gauging plastic
indicates more than .001 in. difference.
6.
If the bearing clearance is within specifications, the bearing insert is satisfactory. If the
clearance is not within specifications, replace the insert. Always replace both upper and
lower inserts as a unit.
7.
A standard, or .001 in., undersize bearing may produce the proper clearance. If not, it
will be necessary to regrind the crankshaft journal for use with the next undersize
bearing.
8.
9.
After selecting new bearing, recheck clearance.
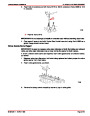
Proceed to the next bearing. After all bearings have been checked, rotate the crankshaft
to see that there is no excessive drag. When checking No. 1 main bearing, loosen acces-
sory drive belts so as to prevent tapered reading with plastic gauge.
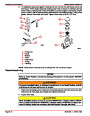
Main Bearing Replacement
1.
2.
3.
Remove and inspect crankshaft.
Remove main bearings from cylinder block and main bearing caps.
Coat bearing surfaces of new, correct-size, main bearing with oil and install in cylinder
block and main bearing caps. Check clearance.
4.
5.
6.
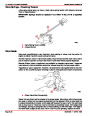
Install crankshaft.
Torque all main bearing caps, EXCEPT THE REAR MAIN CAP, to 75 lb-ft (102 Nm).
Torque rear main bearing cap to 10-12 lb-ft (14-16 Nm); then tap end of crankshaft, first
rearward then forward with a lead hammer. This will line up rear main bearing and crank-
shaft thrust surfaces. Torque rear main bearing cap to 75 lb-ft (102 Nm).
Index
Page 3A-46
90-861329--1 MARCH 1999
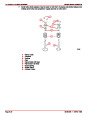
| Categories | Mercury MerCruiser Manuals |
|---|---|
| Tags | Mercury MerCruiser 181 CID |
| Model Year | 1998, 1999, 2000, 2001, 2002, 2003, 2004, 2005, 2006, 2007, 2008, 2009, 2010, 2011 |
| Download File |
|
| Document File Type | |
| Copyright | Attribution Non-commercial |
(6 votes, average: 5 out of 5)
Marine readers have rated Mercury MerCruiser GM 4 Cylinder 181 cid 3.0L Marine Engines Service Manual Number 26 5.0 out of 5.0 based on 6 product reviews. Thanks for sharing this material. Helps a lot after suffering with bad mechanics. spend too much money and nothing very good
great manual, makes impossible jobs possible. without a manual you can not do the job, a must have.
Great resource. Excellent information provided.
Need help to install automate choke
Need help to instal automate choke