


262
CID (4.3L) ENGINES
SERVICE MANUAL NUMBER 25
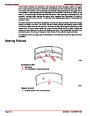
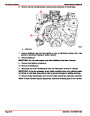
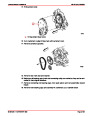
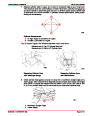
Connecting Rod Bearings
Connecting rod bearings are of the precision insert type and do not use shims for
adjustment. DO NOT FILE RODS OR ROD CAPS. If clearances are found to be excessive,
a new bearing will be required. Service bearings are available in standard size and .001 in.
and .002 in. undersize for use with new and used standard size crankshafts, and in .010 in.
and .020 in. undersize for use with reconditioned crankshafts.
On removing a connecting rod cap, it is possible to find a .010 in. undersize bearing. These
are used in manufacturing for selective fitting.
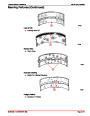
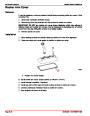
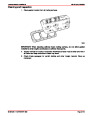
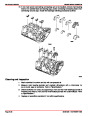
Inspection and Replacement
IMPORTANT: Before you remove the connecting rod cap, mark the side of the rod and
cap with the cylinder number to assure matched reassembly of rod and cap.
1.
2.
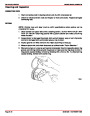
With oil pan and oil pump removed, remove the connecting rod cap and bearing.
Inspect the bearing for evidence of wear and damage. Do not reinstall a worn or
damaged bearing.
3.
4.
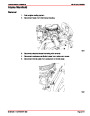
Wipe both upper and lower bearing shells and crankpin clean of oil.
Measure the crankpin for out-of-round or taper with a micrometer. If not within
specifications, replace or recondition the crankshaft. If within specifications and a new
bearing is to be installed, measure the maximum diameter of the crankpin to determine
new bearing size required.
5.
If within specifications, measure new or used bearing clearances with gauging plastic
or its equivalent. If a bearing is being fitted to an out-of-round crankpin, be sure to fit to
the maximum diameter of the crankpin. If the bearing is fitted to the minimum diameter,
and the crankpin is out of round .001 in., interference between the bearing and crankpin
will result in rapid bearing failure.
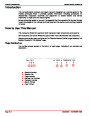
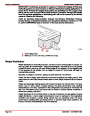
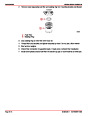
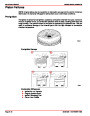
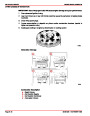
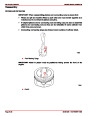
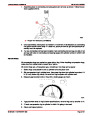
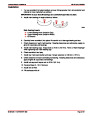
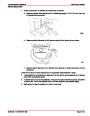
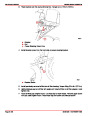
a. Place a piece of gauging plastic, the length of the bearing (parallel to the crankshaft),
on the crankpin or bearing surface as shown. Position the gauging plastic in the
middle of the bearing shell. (Bearings are eccentric and false readings could occur
if placed elsewhere.)
a
72361
a - Gauging Plastic
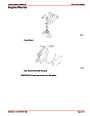
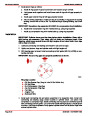
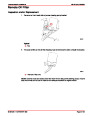
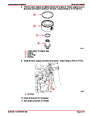
b. Install the bearing in the connecting rod and cap.
c. Install the bearing cap and evenly torque nuts to 45 lb-ft (61 Nm).
IMPORTANT: Do not turn the crankshaft with the gauging plastic installed.
Index
Page 3A-74
90-861328--1 NOVEMBER 1999
| Categories | Mercury MerCruiser Manuals |
|---|---|
| Tags | Mercury MerCruiser 1262 CID, Mercury MerCruiser 262 CID |
| Model Year | 1998, 1999, 2000, 2001 |
| Download File |
|
| Document File Type | |
| Copyright | Attribution Non-commercial |
(4 votes, average: 4.5 out of 5)
Marine readers have rated Mercury-MerCruiser GM V6 262 CID 4.3L Marine Engines Service Manual Number 25 Sections 1-3 4.5 out of 5.0 based on 4 product reviews. This is great. I really like it. Thank you for providing this valuable opportunity for me.
if I can get the info that would be great
The information given is enoug .
In my opinion this is the best site on the net. Assisting people to do a job correctly and safely.