


Product Information
Install propeller nut and tighten to a torque of washer below it. Install all wires from acces-
70-80
ft. lbs. (95-109 N·m).
sories on the threaded portion of the post.
Install keeper on propeller nut, align keeper
slots and cotter pin hole.
Install new cotter pin and bend ends to se-
cure.
Remove block of wood. Make sure engine is
in NEUTRAL; give propeller a spin. It must
turn freely.
Repair
If your propeller hits a solid object, the impact
is partially absorbed by the rubber bushing in
the hub to help prevent damage to the out-
board. A strong impact can damage the hub
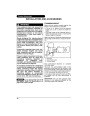
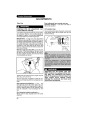
and propeller blades. Damage to blades can 1. Main cable
cause unusual and excessive vibration. Dam- 2. Starwasher
age to the hub can cause excessive engine 3. Accessory wires
RPM with little forward movement.
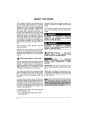
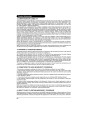
If you have automotive battery posts, place a
IMPORTANT: Avoid or limit operation using a
starwasher on the clamp adapter first, then
the main cable, and then the wires from the
accessories.
damaged propeller. Carry a spare propeller.
Keep your propeller in good condition. Use a
file to smooth slight damage to blade edges.
See your Dealer for repair of serious damage.
BATTERY
Requirements
•
12-volt, heavy-duty, designated for “marine”
use;
•
•
Vented/refillable or maintenance-free; and
Rated according to the minimum require-
ments in Specifications on page 53.
Deep-cycle batteries are suitable IF they
meet or exceed the minimum CCA require-
ments.
Ask your Dealer about your outboard’s re-
quirements before installing longer battery ca-
bles or a battery switch.
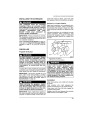
1.
2.
3.
Main cable
Starwasher
Accessory wires
Tighten all connections securely and coat the
installation with Triple-Guard grease.
Installation
WARNING
Read and understand the safety information
supplied with your battery BEFORE you begin
installation.
Keep the battery connections clean,
tight, and insulated to prevent their
IMPORTANT: Make sure all components are shorting or arcing and causing an
clean and free of corrosion.
explosion. If the battery mounting
system does not cover the connec-
tions, install covers. Check often to
see that connections stay clean and
tight.
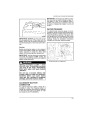
Connect the RED (+) cable to the positive (+)
battery post first. Connect the BLACK (–) ca-
ble to the negative (–) battery post last.
If you have marine battery posts, install each
main cable on the clamp adapter with a star-
50
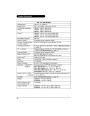
| Categories | BRP Brand Manuals, Evinrude Brand Manuals, Evinrude E-TEC Manual, Evinrude Outboard Manual |
|---|---|
| Document Type | Boat Motor Manual. Marine Operator's Engine Guide. |
| Tags | Evinrude 115 hp, Evinrude 130 hp, Evinrude 150 hp, Evinrude 175 hp, Evinrude 200 hp, Evinrude BX, Evinrude CX, Evinrude HL, Evinrude HX, Evinrude MX 60, Evinrude PL, Evinrude PX, Evinrude SL |
| Model Year | 2011 |
| Download File |
|
| Document File Type | |
| Publisher | evinrude.com |
| Wikipedia's Page | Evinrude Outboard Motors |
| Copyright | Attribution Non-commercial |
(4 votes, average: 4.25 out of 5)
Marine readers have rated 2011 Evinrude 115 130 150 175 200 hp E-TEC PL PX SL BX HL HX CX MX 60 Outboard Boat Motor Owners Manual 4.3 out of 5.0 based on 4 product reviews. Desidero avere il manuale per conoscere il tipo di motore.
Sono interessato alla conoscenza di questo tipo di motore.
no problems with my 130 etec so far. Its a 2011 model. Used in saltwater.
looking for the perfect manual